How to integrate my store with GetResponse via custom API integration?
If you are not using any of the common e-commerce platforms we integrate with, you can build a custom integration via API with your store to use automation for various ecommerce workflows, such as abandoned cart recovery.
You will need a developer familiar with API. While we can assist with the process, technical expertise is required on the customer’s side.
Please share the below guide with your IT/development team.
Creating your shop
To get started, first create a shop using the createShop API call. In the API call you need to provide the following information:
- Name – the name of your shop. This is an internal name that you’ll see inside your account.
- Locale – the locale for your store.
- Currency – the currency used in your store.
Once you submit your store, you’ll receive a response with the shopID as well as the details you’ve submitted. This shopID will be used in all of the API calls related to your store.
Creating a product
To create a product, use the createProduct call. You’ll need the following details:
- Name – the name of your product.
- URL – the URL of your product. It is optional, however this is the URL that will be used in all links to your product in messages, landing pages and website builder pages.
- Variants – these variants are what your customers are going to be purchasing. If your product has multiple variants, like colours or sizes, you can list them out here. Variants require the following infomation:
- Name – the name of your variant.
- SKU – Stock Keeping Unit, an unique ID of your variant used for tracking stock.
- Price – price without tax. This price will be displayed in all elements that display your product in messages, landing pages and website builder pages.
- priceTax – price with tax. This price is not displayed anywhere.
Creating a category
This is an optional step.
Once the store is created, you can create some categories to make it easier to sort your products.
Customers that have purchased something from a category can be used in dynamic segments.
To create a category, use the createCategory API call. This category only requires the name of your category, but if you want to have subcategories, you can also assign a parentId of the parent category.
Adding variants to your product
If you need to add additional variants to your product, you can do that through the createProductVariant call. The information you’ll need to include is:
- Name – the name of your variant.
- SKU – Stock Keeping Unit, a unique ID of your variant used for tracking stock.
- Price – price without tax. This price will be displayed in all elements that display your product in messages, landing pages and website builder pages.
- priceTax – price with tax. This price is not displayed anywhere.
Processing customers’ carts and orders
As soon as the cart is created, any automation workflows that start with an abandoned cart element will be triggered for the contact and the countdown timer for the abandoned cart will start.
Once this timer expires, the contact will match the condition of the abandoned cart and go through to the next step in the workflow.
Creating a cart
The first step to processing a customer’s cart and order is to create a cart for the customer using the createCart call. The cart requires the following information:
- Contact ID – the ID of your contact. This ID can be obtained by using getContactList, getContactsFromCampaign or via webhooks and callbacks.
- TotalPrice – the total price of the products in the cart.
- Currency – the currency for the order.
- selectedVariants – the variants selected by the customer. These variants need to contain the following information:
- variantId – the ID of the variant of a selected product.
- quantity – the quantity of the selected product.
- price – the total price of the selected variant.
- taxPrice – the price of the variant with tax.
- cartUrl – this is the URL of the cart. It is optional, however it will be used in the cart call to action button in the abandoned cart module, so it is recommended to be included.
Deleting a cart
You can delete a cart by using the deleteCart API call. This is used if you want to completely close the customer’s cart or if the cart has been converted to an order.
A separate deleteCart API call is required to prevent abandoned cart automation to be triggered from the previously created cart.
Updating a cart
The updateCart function lets you update your cart.
You can use this to add or remove variants from the cart, update the price, update the URL of the cart or add any external IDs.
No values in this call are required, however selectedVariants will replace the current cart contents, so make sure to include all of the selected variants that the customer holds in their cart.
Creating an order
The order can be created using the createOrder API call. You can create an order without creating a cart first if you do not want to process an abandoned cart. The required fields are:
- Contact ID – the ID of your contact. This ID can be obtained by using getContactList, getContactsFromCampaign or via webhooks and callbacks.
- TotalPrice – the total price of the products in the cart
- Currency – the currency for the order
- selectedVariants: The variants selected by the customer. These variants need to contain the following information:
- variantId – the ID of the variant of a selected product
- quantity – the quantity of the selected product
- price – the total price of the selected variant.
- taxPrice – the price of thevariant with tax
- cartId – the ID of the cart. Used if you want to tie the order to a previously created cart.
- status (optional) – the status of the order. This field is optional, but is useful if you want to use ecommerce reporting in the GetResponse panel.
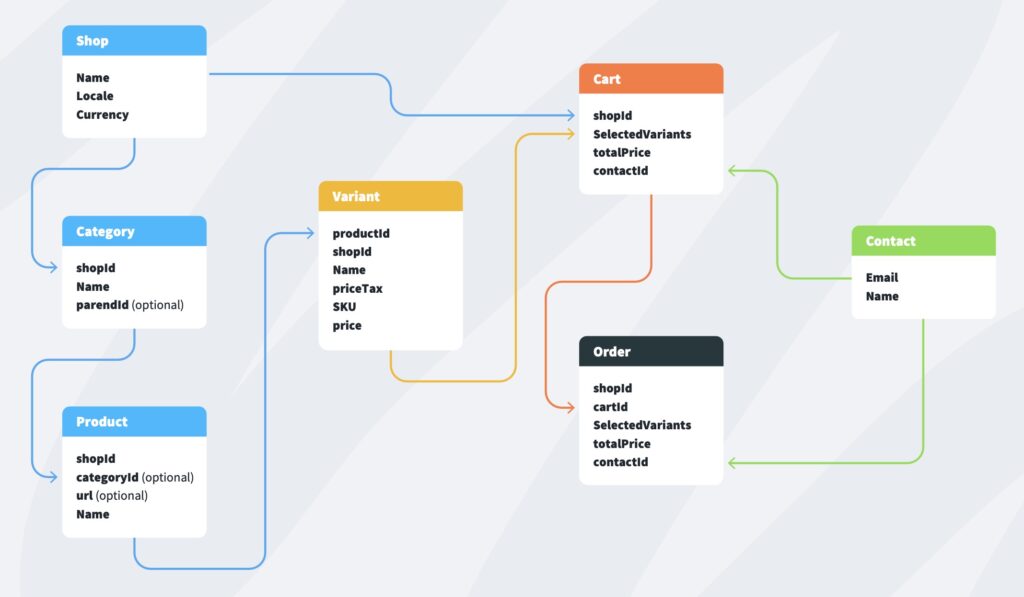
A visual representation of your store